I’ve been using LaTeX for almost a decade now. Even after that much time, I keep running into new problems that require a solution I wasn’t aware of. LaTeX has a great community and usually there’s someone that already faced your problem. Every time I learn something new.
This post discusses some packages that I consider to be essential, or that you should be at least aware of. I’m assuming you already know the basics, but if you don’t (and maybe even if you do) I can recommend The Not So Short Introduction to LATEX 2ε by Tobias Oetiker.
Cross-Referencing
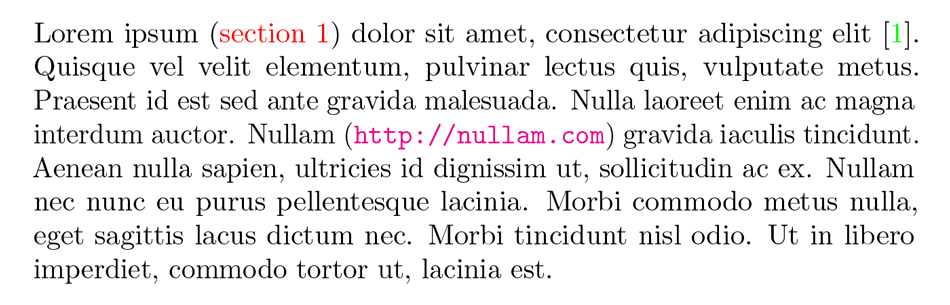
The hyperref package automatically adds links and bookmarks to your document. The table of contents, references, URLs and citation all become clickable in the resulting PDF.
Additionally, the package provides the autoref command which references a label, displaying not only the counter but also the type or reference. For example, when referencing a label belonging to a figure, \autoref{label} displays Figure 1 while \ref would only show the counter number requiring you to write Figure~\ref{label}.
The package should be loaded last to prevent it from getting overwritten. I prefer my links to be colored rather than having a border around them, but they can also be hidden with the option hidelinks.
\usepackage[colorlinks]{hyperref}
Quotes
The csquotes package provides “advanced facilities for inline and display quotations”. I mainly use the enquote command to put its argument between quotation marks. Alternatively you could use ligatures, two back-ticks and single quotes for opening and closing quote respectively. However, because enquote is context-sensitive, it will manage nested quotations for you.
Modularity with Subfiles
When working on a large document, it is beneficial to split your document into different files. In contrast to working with the default input or include, the subfiles package lets you create files that can be compiled independently of the main document.
Your main and subfile look like the following blocks respectively.
...
\usepackage{subfiles}
...
\begin{document}
...
\subfile{⟨subfile name⟩}
...
\end{document}
\documentclass[<main file name>]{subfiles}
...
\begin{document}
...
\end{document}
Microtype
The microtype package enables micro-typographic extensions offered by some of the latex compilers. It offers character protrusion, font expansion, additional kerning and the adjustment of interword spacing. Although I do recommend reading the 30 page manual, you can check out this guide for the key points. I’ve been using the same options as proposed in that blogpost.
\usepackage[activate=true,nocompatibility},
    final,
    tracking=true,
    kerning=true,
    spacing=true,
    factor=1100,
    stretch=10,
    shrink=10]{microtype}
Professional Looking Tables
Default tables in LaTeX aren’t exactly good looking. The booktabs package adds horizontal rules with additional spacing, tables look clean and professional. The picture below is taken from the manual and illustrates the use of the \toprule, \midrule and \bottomrule.
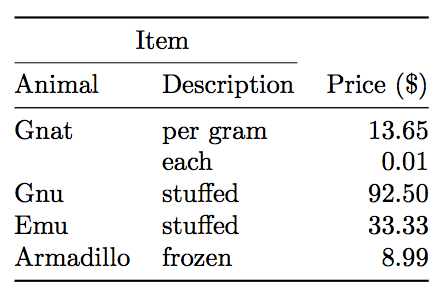
Another table-related package is tabularx which allows you to create tables that match the width of the paragraph. It differs from tabular* by changing the width of the actual columns rather than the spacing between them.
When you have tables spanning multiple pages, you might want to check out the longtable package. It allows you to create tables that can be broken by the standard page-breaking algorithm.
Geometry
Another essential package is geometry. The package provides an easy yet powerful interface to defining page dimensions. Depending on the document you might want to change the margins of the document, which can be set with top, bottom, outer and inner. The heightrounded option rounds the text height to prevent “underfull vboxes”. The package offers much more options detailed in the manual.
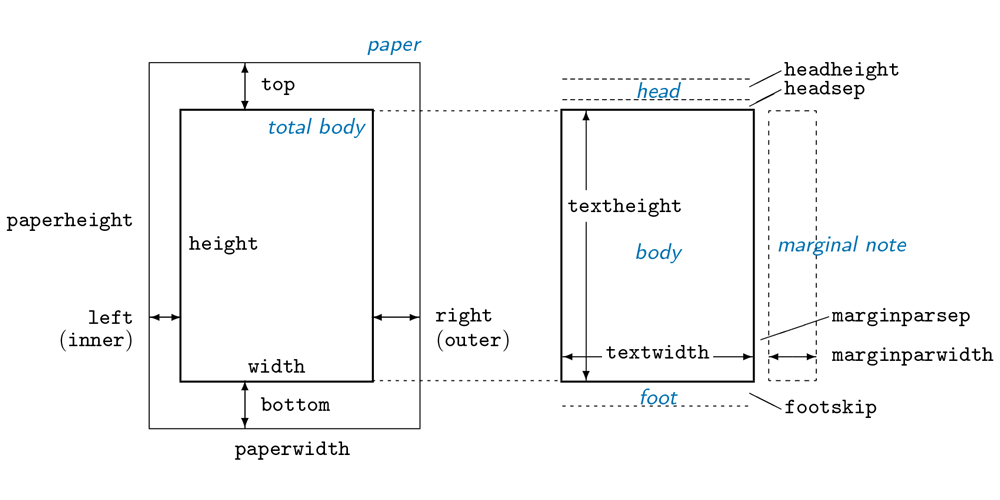
\usepackage[a4paper,
    top=3cm,
    bottom=3cm,
    outer=3cm,
    inner=3cm,
    heightrounded]{geometry}
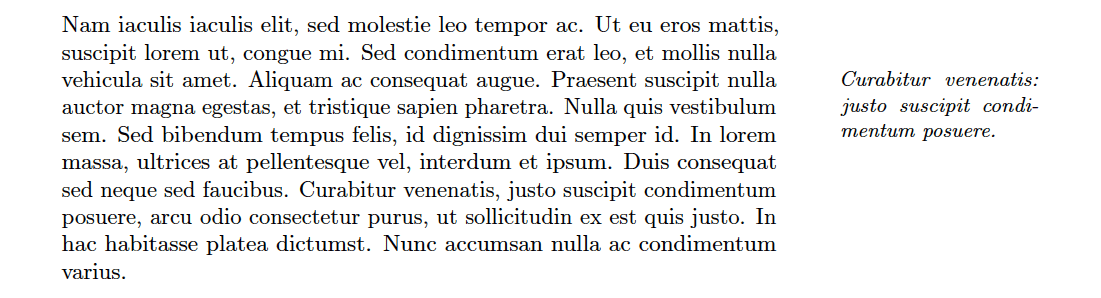
Notes in the Margin
I recently needed to add comments to a document’s margin. The marginnotes package offers exactly what its name says. Unfortunately the package has some problems which are solved in the mparhack and marginfix. The exact problems these solve are discussed in their manual. If you want to use notes in the margin, I strongly recommend including all three packages.
\usepackage{marginnote}
\usepackage{mparhack}
\usepackage{marginfix}
Source Code Listings
As a student of computer science I’ve had to include code in my document on several occasions. The listings is a powerful package that helps you typesetting source code. It is vastly configurable and has built-in support for many languages. It supports external files which makes including them a breeze.
\begin{lstlisting}[caption={Message sent from the tile to the monitor on creation.}, label=lst:monitor]
monitor ! {status, Pid, Id, Value, Merged}
\end{lstlisting}

Several example configurations are given on the wikibooks page which should get you started defining your own.
PGF/TikZ
The PGF package is used to create vector graphics programmatically. It comes with a user-friendly syntax layer called TikZ. This package is extremely powerful. There exist many tutorials for getting started with TikZ and a vast amount of resources.
The code below is a minimal example that draws connections between the given point, drawing a triangle. Many more examples can be found here.
\documentclass{article}
\usepackage{tikz}
\begin{document}

\begin{tikzpicture}
\draw (0,0) -- (0,2) -- (2,0)-- (0,0);
\end{tikzpicture}

\end{document}

PGFPlots
The PGFPlots package uses PGF to draw professionally looking charts and plots. This gallery gives a good impression of the possibilities. You probably want to check out the manual, but don’t be intimidated by its length and use your viewer’s search function!
You can easily read external files, so having your software output CSV-like files makes plotting them extremely simple once you have configured your desired plot.
Fancy Headers
With fancyhdr you can customize the page layout with a header and footer. The manual contains useful examples of how to add numbering, section titles or other information to the top and bottom of your pages. You can even mimic the book style in other document classes.
AMS (American Mathematical Society)
The American Mathematical Society has created some packages for mathematical typesetting in LaTeX. The amsmath package extends the default math related capabilities of LaTeX. The amssymb adds additional symbols and fonts for formulas.
The AMS also offer amsthm for typesetting theorems, but I prefer the ntheorem package which provides more customization. As soon as your document contains a formula I would recommend loading the ams packages.
\usepackage{amsmath,amssymb}
\usepackage{ntheorem}
List Environments
The enumitems package improves the capabilities of the three list environments: enumerate, itemize and description. The package provides different styles which might come in handy depending on what you’re trying to achieve. I came across the package when looking for a solution for long labels in a description environment.
\usepackage{enumitem}
\setlist[description]{style=nextline}
Glossaries and Acronyms
If your document contains a lot of acronyms (as my thesis did), you can take a look at the glossaries package. It is a powerful package with support for creating (multiple) glossaries and a list of acronyms. You are required to run the makeglossaries script, but fortunately you don’t really need to change your workflow as this is only necessary to make the alphabetically sorted list.
You can create acronyms using the \newacronym{<label>}{<abbrv>}{<full>} command and refer to them with the \gls{<label>} command. On the first encounter the acronym is given together with its description. From then on the abbreviation is used. Different commands enable capitalization (\Gls) and printing out the plural (\glspl ).
Include PDFs
The pdfpages package enables the inclusion of external PDF files into your document. You can specify what pages to include and how to position them.
The example below shows how I used the package to print an A3 document side by side on an A4 page in landscape.
\documentclass[a4paper]{article}
\usepackage{pdfpages}

\begin{document}
\includepdf[pages={1,3-},nup=1x2,landscape=true]{main.pdf}
\end{document}
Framed Environments
The mdframed package provides the possibility to frame environments. The result is highly customizable as shown in the manual. I personally prefer TikZ as the framemethod as the default tends to perform poorly when opened in a PDF viewer.
\usepackage[framemethod=tikz]{mdframed}